Edge Collective
Notes on Ham Radio
Notes on Ham Radio2021-11-09 12:40:30
Notes on kits: https://www.hamradiosecrets.com/ham-radio-kits.html
APRS
DORJI
https://www.tindie.com/products/dorji_com/ham-amateur-radio-module-dra818v/
http://squirrelengineering.com/arduino/dra818v-aprs-144-390mhz/
https://hamgear.wordpress.com/2015/02/03/make-your-own-transceiver-with-a-dorji-dra818u-or-dra818v/
https://nescitech.org/ham-exam-contact-us/
QRP Labs device for $60: https://hackaday.com/2021/12/08/four-band-digital-hf-sdr-transceiver-offers-high-performance-for-only-60/
APRS on micros
Micromodem
Github repo for micromodem: https://github.com/markqvist/MicroModem
Key diagram for circuit: https://github.com/markqvist/MicroModem/blob/master/Documentation/Quickstart.pdf
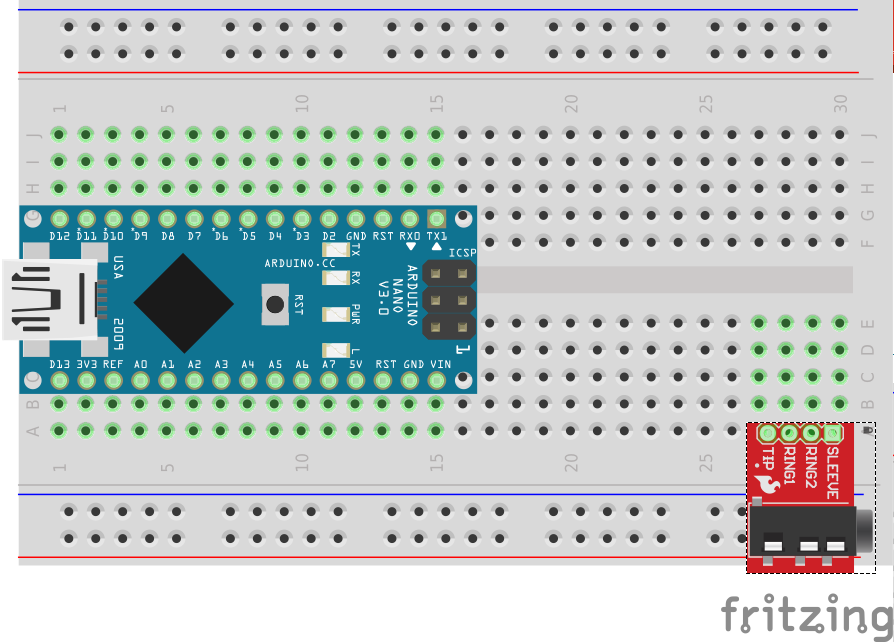
Mobilinkd Arduino KISS TNC
http://www.mobilinkd.com/2014/09/11/arduino-kiss-tnc/
Uses the Sparkfun 3.5 mm jack breakout:
http://www.mobilinkd.com/wp-content/uploads/2014/09/Breadboard-TNC_bb_2.png
    Sleeve is ground.
    Ring2 is audio out (TX)
    Ring1 is PTT
    Tip is audio in (RX)
Adding GPS
use Example3_GetPosition from UBLOX GNSS Sparkfun lib https://github.com/sparkfun/SparkFun_u-blox_GNSS_Arduino_Library/archive/main.zip
Hmm ... module requires 3V ...
might need to try arduino pro mini 3V if avail ... or 5V tolerant gps module (adafruit's?)
LibAPRS Tracker -- minified version of LibAPRS
https://github.com/barisdinc/LibAPRS_Tracker
LibAPRS
https://github.com/markqvist/LibAPRS
MicroAPRS
This is the code for handling APRS, allows for serial commands -- pin hardware might be fixed in firmware, not an issue
Expects to be run at 5V ... will need level shifters for ESP32, likely
Sat Oct 21 04:30:32 PM EDT 2023
https://oh2lak.blogspot.com/2017/06/experimenting-with-sa818-miniature-rf.html
https://www.youtube.com/@HB9BLA
Tue Feb 20 05:57:13 PM EST 2024
https://www.kenwood.com/i/products/info/amateur/ts50s.html
https://www.radiomods.co.nz/kenwood/kenwoodts50.html
suggests we want an AT50 tuner
Kenwood TS-50S instruction manual
Power supply is Kenwood PS-33:
Possible compatibility? plug on amazon
Wiring diagram for TS-50S power cable
Mon Apr 15 09:46:55 PM EDT 2024
'what to do when the phones go down' video
Fri Apr 19 06:17:47 PM EDT 2024
Getting started with JS8Call
receive-only
-
web sdr / software-only here
-
off-grid basic receive with simple radio, unlicensed here
-
js8call training edition here
Fri Apr 19 08:38:04 PM EDT 2024
Virtual Audio Cable for linux here
Ham It Up adapter kit for sdr here
ham it up, by itself here
ham it up kit working well here
For those having trouble with the Ham It Up, this may be obvious to some, but frequencies below 14 MHz (20m HAM band) are best received at night. During the daytime you have a good chance of getting transmissions above 14 MHz. Also, I have tried using the Ham It Up in Windows 10 with SDR# and Kali Linux with SDR++. By far, the Kali setup works the best. I don't think you necessarily need the Kali Distro, that is just my setup. I will admit that the time investment needed to get this bundle operational is higher but if you do the research and don't give up the payoff is great.
The Ham It Up is a neat unit, but is genuinely hard to get started with due to wholly insufficient documentation. I was ready to write it off as junk before I finally figured out its antenna needs. Here is what you need to know from my hours of frustration:
- Offset is 125MHz, so a 25MHz signal will be upconverted to 150MHz
- It has a upconvert range of 100KHz to 60MHz, good for AM and shortwave bands. US FM broadcasting can't be used as a passthrough/upconvert test to get started as the frequency is too high.
- It doesn't work with any of the included antennas, or any commercial antennas I tried. I was only able to achieve acceptable reception with the balun, 100' of wire as an antenna strung outside in the trees, and a good ground. Think crystal radio when setting up the antenna for the upconverter.
- Once the wire was strung outdoors I was able to pick up commercial AM broadcasting, some HAM chatter in the 40 meter band, and shortwave stations in the 11MHz range, and acceptable CB reception.
- Documentation for this is even worse than for the NESDR. Be prepared to be frustrated until you figure it out.
Tecsun PL880 shortwave radio, $169
-- on amazon
SIHUADON R108 -- inexpensive knock-off of Skywave, $50
off-grid js8call setup with digital-only radio
So -- better to use an sdr dongle, or a full short wave radio?
Sun Apr 21 03:09:31 PM EDT 2024
js8call here
T-Deck pinmap here
fdisk erase partitions tutorial
pi + baofeng aprs digipeater here
Sun Apr 21 11:20:13 PM EDT 2024
T-beam + external keyboard tutorial here and thread here
Using the 'canned message' meshtastic feature here
and the CardKB device described here
programming the CardKB here
documentation for CardKB i2c code here
electronoobs keyboard here -- this is the tutorial to try
antenna upgrades for meshtastic devices here
arduino as i2c slave here and here
using cardkb in a hack way with python
suggestion of mouse buttons for key buttons
connecting cardkb to raspberry pi here
Mon Apr 22 05:29:46 PM EDT 2024
Some example code for reading from a cardkb here
Creating an arduino i2c slave here -- see example 2. Arduino I2C Slave Transmitter Example
/*
* LAB Name: Arduino I2C Slave(Tx)
* Author: Khaled Magdy
* For More Info Visit: www.DeepBlueMbedded.com
*/
#include <Wire.h>

#define BTN0_PIN 4
#define BTN1_PIN 5
#define BTN2_PIN 6
#define BTN3_PIN 7

byte TxByte = 0;

void I2C_TxHandler(void)
{
  Wire.write(TxByte);
}

void setup() {
  pinMode(BTN0_PIN, INPUT_PULLUP);
  pinMode(BTN1_PIN, INPUT_PULLUP);
  pinMode(BTN2_PIN, INPUT_PULLUP);
  pinMode(BTN3_PIN, INPUT_PULLUP);
  Wire.begin(0x55); // Initialize I2C (Slave Mode: address=0x55 )
  Wire.onRequest(I2C_TxHandler);
}

void loop() {
  byte BtnsData = 0;
  BtnsData |= digitalRead(BTN0_PIN) << 0;
  BtnsData |= digitalRead(BTN1_PIN) << 1;
  BtnsData |= digitalRead(BTN2_PIN) << 2;
  BtnsData |= digitalRead(BTN3_PIN) << 3;
  TxByte = BtnsData;
  delay(10);
}
Sat Apr 27 06:30:16 PM EDT 2024
Ham it up explanatory video here
40 meter dipole antenna here
Creating a 40 meter antenna here
How to make a 40 meter dipole antenna here
making a 20 m and 40 m dipole antenna here
homemade balun -- SO2-39
definition of a balun here
complete off-grid HF ham pack here
js8call mesh experiment here
simplest dedicated js8call rig discussion here
Sun May 5 04:16:25 PM EDT 2024
heltec gps forum topic (including pins) here
flashing firmware on esp32 devices here
-
cli script method here
-
configuring device via CLI here
-
canned message here
-
proper i2c pins for heltec v3 here
-
heltec pinout [here](
-
cardkb description here
-
black / gnd, red / 3v, yellow sda, white scl
-
41 is sda, 42 is scl on heltec v3
-
yellow to 41, white to 42
Sun May 5 06:53:55 PM EDT 2024
meshtastic message history, thread here
github most recent messages issue here
semi-relevant discussion here
meshcom -- mesh for ham radio operators, compatible with aprs here
Fri May 10 02:56:05 PM EDT 2024
Meshtastic device configuration here
#define CARDKB_ADDR 0x5F  //Define the I2C address of CardKB.
#include <Wire.h>

void setup() {
  Wire.begin();
  Serial.begin(9600);
}
void loop()
{
  Wire.requestFrom(CARDKB_ADDR, 1); //Request 1 byte from the slave device.
  while (Wire.available()) {
    char c = Wire.read();
    if (c != 0)
    {
      if (c == '\x0D') {
        Serial.println();
      }
      else {
      Serial.print(c);
    }
      //Serial.print(c,HEX);
    }
  }
}
/*
Example of processing incoming serial data without blocking.

Author:   Nick Gammon
Date:     13 November 2011.
Modified: 31 August 2013.

Released for public use.
*/

#define CARDKB_ADDR 0x5F  //Define the I2C address of CardKB.
#include <Wire.h>

// how much serial data we expect before a newline
const unsigned int MAX_INPUTTY = 50;

void setup ()
  {
      Wire.begin();
  Serial.begin (115200);
  Serial1.begin(38400);
  } // end of setup

// here to process incoming serial data after a terminator received
void process_input_data (const char * data)
  {
  // for now just display it
  // (but you could compare it to some value, convert to an integer, etc.)
  Serial.println(data);
  }  // end of process_data

void process_output_data (const char * data)
  {
  // for now just display it
  // (but you could compare it to some value, convert to an integer, etc.)
  Serial1.println(data);
  }  // end of process_data

void processIncomingByte (const byte inByte)
  {
  static char input_line [MAX_INPUTTY];
  static unsigned int input_pos = 0;

  switch (inByte)
    {

    case '\n':   // end of text
      input_line [input_pos] = 0;  // terminating null byte

      // terminator reached! process input_line here ...
      process_input_data (input_line);

      // reset buffer for next time
      input_pos = 0;
      break;

    case '\r':   // discard carriage return
      break;

    default:
      // keep adding if not full ... allow for terminating null byte
      if (input_pos < (MAX_INPUTTY - 1))
        input_line [input_pos++] = inByte;
        //Serial.print(inByte);
      break;

    }  // end of switch

  } // end of processIncomingByte


  //void processOutgoingByte (const byte outByte)
   void processOutgoingByte (char outByte)
  {
  static char output_line [MAX_INPUTTY];
  static unsigned int output_pos = 0;

  switch (outByte)
    {

    case 0:
      break;


    case '\x0D':   // end of text
      output_line [output_pos] = 0;  // terminating null byte
      Serial.println();
      // terminator reached! process input_line here ...
      process_output_data (output_line);

      // reset buffer for next time
      output_pos = 0;
      break;

    //case '\r':   // discard carriage return
    //break;

    default:
      // keep adding if not full ... allow for terminating null byte
      //Serial.print(outByte);
      if (output_pos < (MAX_INPUTTY - 1))
        output_line [output_pos++] = outByte;
        Serial.print(outByte);
      break;

    }  // end of switch

  } // end of processIncomingByte


void loop()
  {
  // if serial data available, process it
  while (Serial1.available () > 0)
    processIncomingByte (Serial1.read ());

  Wire.requestFrom(CARDKB_ADDR, 1); //Request 1 byte from the slave device.
   while (Wire.available())
    processOutgoingByte (Wire.read());

  // do other stuff here like testing digital input (button presses) ...

  }  // end of loop
meshtastic_to_serial_cardkb
Sat May 11 04:42:13 PM EDT 2024
circuitpython module for waveshare e-paper here
arduino libraries for waveshare here
Sat May 11 07:13:12 PM EDT 2024
using cardkb in circuitpython here
cardkb layout here
better cardkb layout here

asking for enclosure with tbeam and cardkb here
up: 0xB5 down: 0xB6 left: 0xB4 right: 0xB7
wrapping text in circuitpython on a display here
Sun May 12 09:07:23 PM EDT 2024
RAK4631 documentation for module [here](https://docs.rakwireless.com/Product-Categories/WisBlock/RAK4631/Overview/#product-description
RAK19007 is the base I bought. RAK19007 documentation here
RAK19007 product guide here
- description of headers is here
custom nodes here
Mon May 13 06:26:40 PM EDT 2024
nrf52 dongle prototyping here
nrf52 variant here
another nrf52 variant board here
board with adafruit feather express here
rak IO module on digikey here
rak19007 pinout description here
Mon May 13 10:01:22 PM EDT 2024
using the cli to talk / hear nodes here
rxd 7 txd 47 baud 38400 mode textmsg
in arduino ide, use 'new line'
waveshare:
guide for 2.13 e ink here
same on itsy m0, but: rst d7 busy d12
arduino library for waveshare here
getting serial data on arduino without blocking here
circuitpython tips and tricks here
meshtastic-to-serial is basic working version
suggestion on reading bytes from keyboard here
Tue May 14 03:02:50 PM EDT 2024
rtc power switches:
- https://electronics.stackexchange.com/questions/396748/rtc-power-switch-for-raspberry-pi
- sweech
- https://forum.dronebotworkshop.com/components/external-power-on-off-control-circuit/paged/3/
- https://hackaday.com/2019/06/24/ditch-the-switch-a-soft-latching-circuit-roundup/
- https://sites.google.com/site/wayneholder/time-based-and-low-power-techniques-for-arduino
- https://randomnerdtutorials.com/latching-power-switch-circuit-auto-power-off-circuit-esp32-esp8266-arduino/
- https://www.eevblog.com/forum/beginners/switching-12v-power-from-ds3231-open-drain-intsqw-pin/ -- this might be where to begin!
- another simple explanation here: https://forum.arduino.cc/t/power-on-off-with-ds323rtc/308686/6
- need a p-mos for a ds3231 circuit https://forum.arduino.cc/t/using-ds3231-rtc-alarm-pin-to-power-mosfet/219377